Administration V2
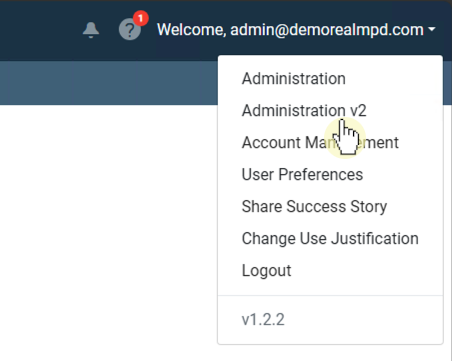
To reach Administration, click the dropdown in the toolbar and select “Administration V2”. If you manage multiple realms, there is a secondary login screen (see Global Admin)
Last updated September 24, 2024
To reach Administration, click the dropdown in the toolbar and select “Administration V2”. If you manage multiple realms, there is a secondary login screen (see Global Admin)
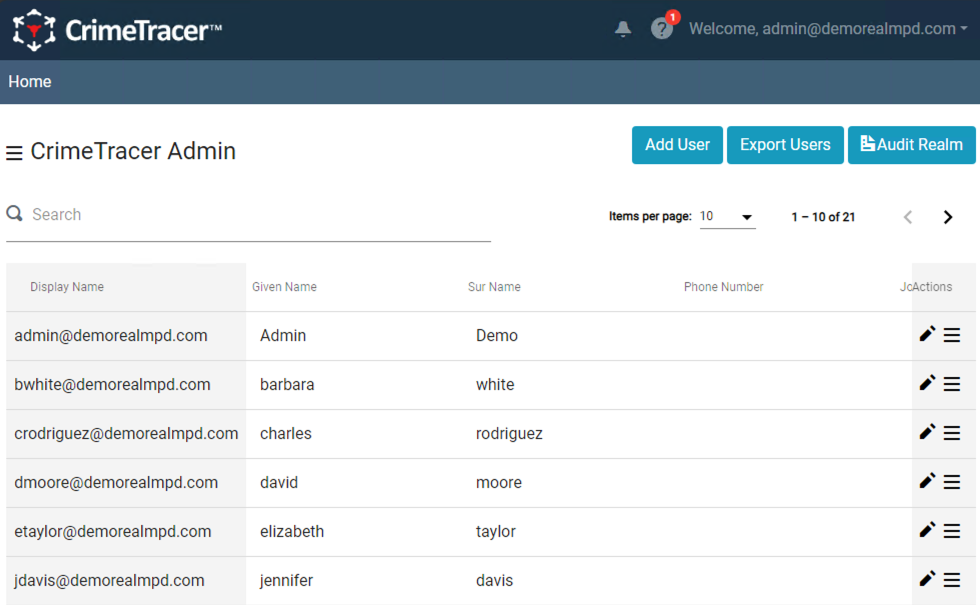
Once inside Administration, The User Manager is the first tab you will land on.
The User Manager lists all users of a realm in a table and includes columns for most major attributes.
Click the “Add User” button. This will create a new row in the User Manager table where the user’s attributes can be entered. Email, Given Name, and Sur Name are required. When you are ready, click the checkmark in the “Actions” column at the right side of the row. To cancel adding the user, click the “X” icon.
A .csv of users in a realm can be produced by clicking the “Export Users” button. This will produce a file containing all the attributes seen in the User Manager table. This same file can be modified and re-uploaded to perform a batch update. See “User Import” section.
Audit Realm is a feature that produces a .csv file of query statistics across one (or multiple for Global Admins) realms. Click “Audit Realm” at the top right and enter a date range into the modal.
The output file shows the number of searches by month, agency, and year. These can be broken down further by selecting the “Group By User” checkbox.
Global Admins also have the option to select multiple realms when generating this report.
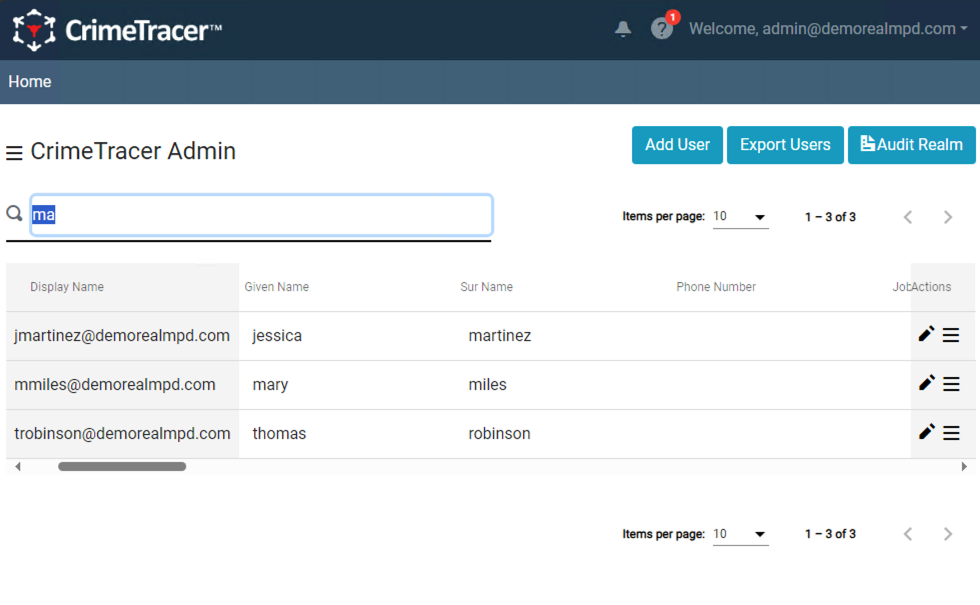
The Search bar at the top of the table can be used to filter the user table by Firstname, Lastname, and Email
In the user manager table, at the end of each row is an "actions" column.
Below is an explanation of each action that can be performed
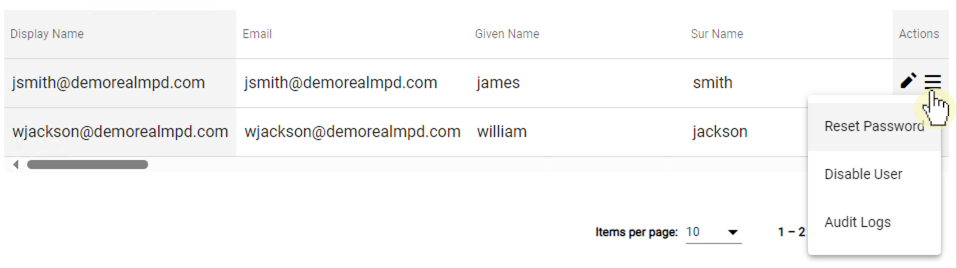
Click the menu icon in the “Actions” column for a user. Select “Reset Password”. This action will send a password reset email to the user.
Disable UserClick the menu icon in the “Actions” column for a user. Select “Disable User”. This will immediately disable the chosen user. Note that disabled users are displayed in red and are sorted AFTER enabled users.
Audit LogsClick the menu icon in the “Actions” column for a user. Select “Audit Logs”, then enter a date range in the modal. This will produce a .csv file containing login and logout events, login errors, password updates, and user searches.
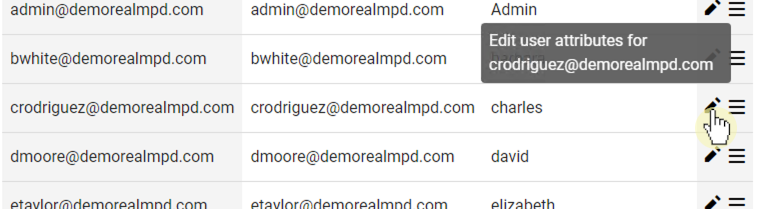
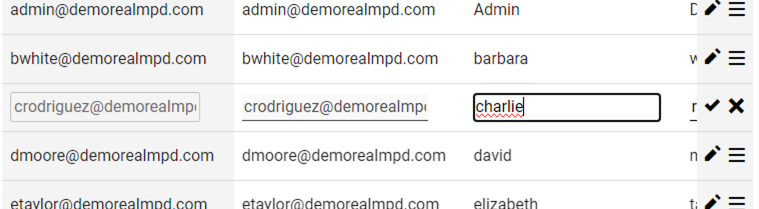

Click the pencil icon in the Actions column. This will enable editing on the respective row. User attributes can be edited by making changes. When you are ready, click the checkmark in the “Actions” column, or click the “X” icon to cancel.
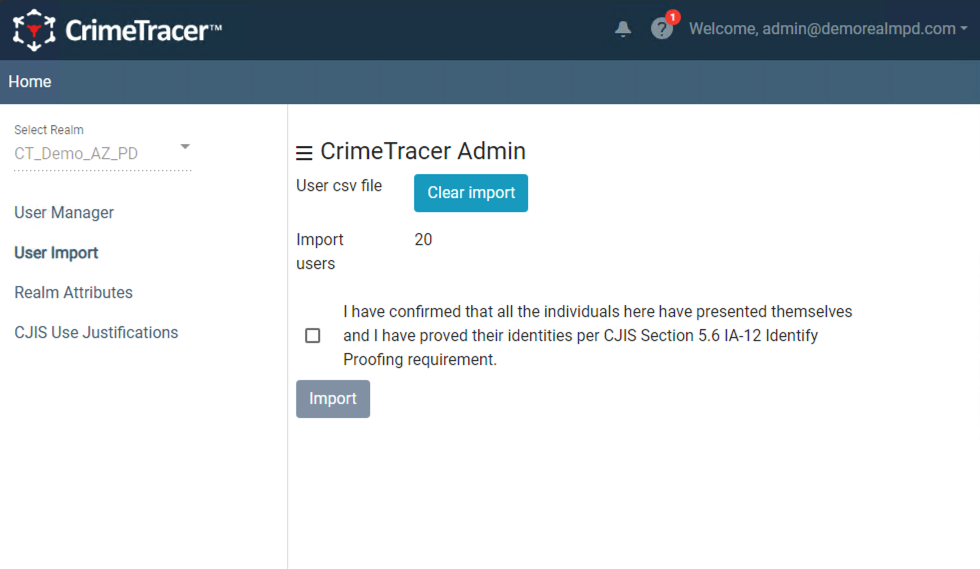
User Import is a way to add a batch of users to CrimeTracer by uploading a .csv file.
Click “Choose File” and select a .csv file. And click “Import”. Email, firstname, and lastname are required columns when adding a new user.
A template .csv file for uploading users can be found here:
Import Template
To perform a batch update, it is recommended that you first export from the User Manager, make changes, then upload the modified .csv file.
The Attributes below can be assigned on creation or on update. Please refer to "Account Management" in the latest CJIS documentation for detailed explanations on the following attributes.
| Attribute | Notes |
| id (CrimeTracer local id) | required for updates |
| username | |
| Cannot be updated | |
| firstName (given name) | |
| lastName (sur name) | |
| mobilePhoneNumber | |
| jobTitle | |
| roles | Cannot be updated lists roles related to the user |
| lastLoginTime | Cannot be updated |
| lastPasswordTime | Cannot be updated |
| createdTimestamp | Cannot be updated |
| emailVerified | Cannot be updated |
| enabled | Cannot be updated use UI controls to enable/disable |
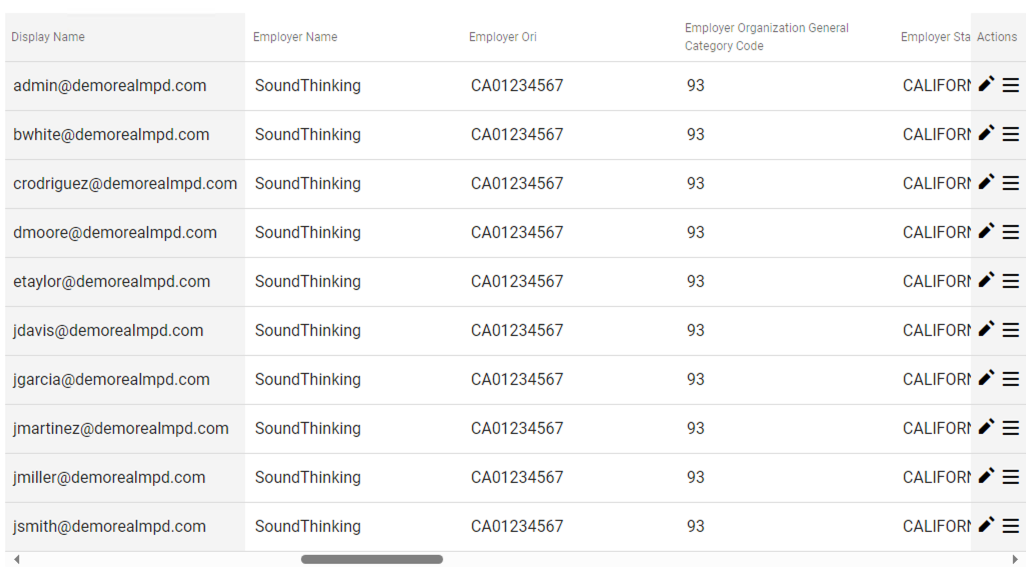
| employerName | Inherits Realm Value |
| employerOri | Inherits Realm Value |
| employerOrganizationGeneralCategoryCode | Inherits Realm Value |
| employerStateCode | Inherits Realm Value |
| federationId | |
| identityProviderId | |
| uniqueSubjectId | |
| swornLawEnforcementOfficerIndicator | |
| swornLawEnforcementOfficerIndicator | |
| publicSafetyOfficerIndicator | |
| intelligenceAnalystIndicator | |
| counterTerrorismDataSelfSearchHomePrivilegeIndicator | |
| criminalHistoryDataSelfSearchHomePrivilegeIndicator | |
| criminalIntelligenceDataSelfSearchHomePrivilegeIndicator | |
| criminalInvestigativeDataSelfSearchHomePrivilegeIndicator | |
| governmentDataSelfSearchHomePrivilegeIndicator | |
| ncicCertificationIndicator | |
| ndexPrivilegeIndicator | |
| 28CfrCertificationIndicator | |
| authenticatorAssuranceLevel | |
| federationAssuranceLevel | |
| identityAssuranceLevel |

Some attributes are assigned to an entire realm and serve multiple purposes. Most of these attributes can only be edited by CrimeTracer support.
Some attributes are assigned to an entire realm and serve multiple purposes. Most of these attributes can only be edited by CrimeTracer support.
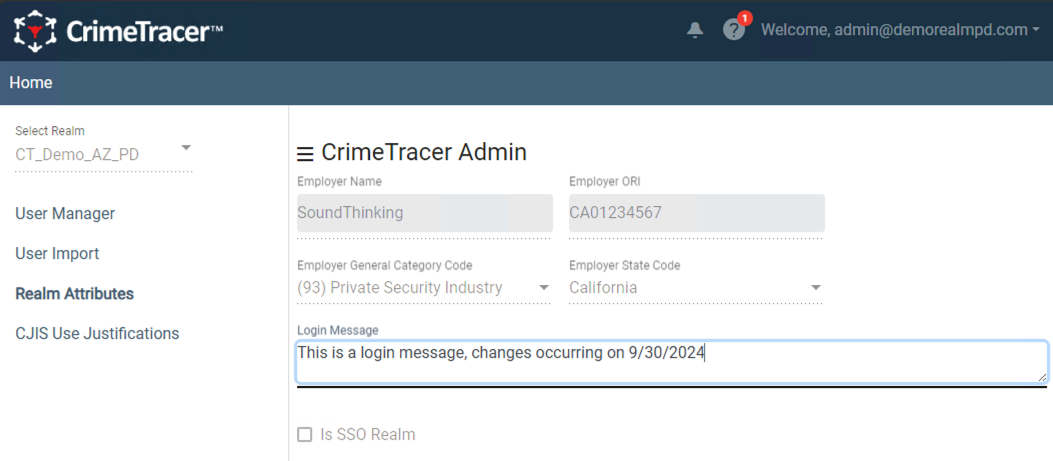
A login message can be set by admins.
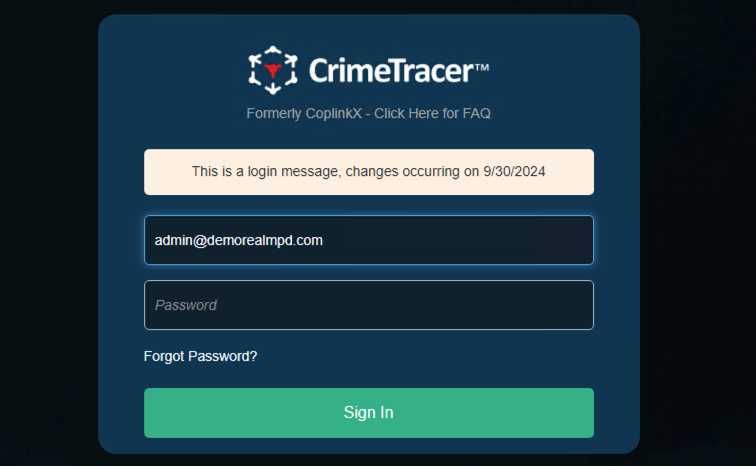
After users enter their username, this message will be displayed on the Username and Password screen for all users in the realm.
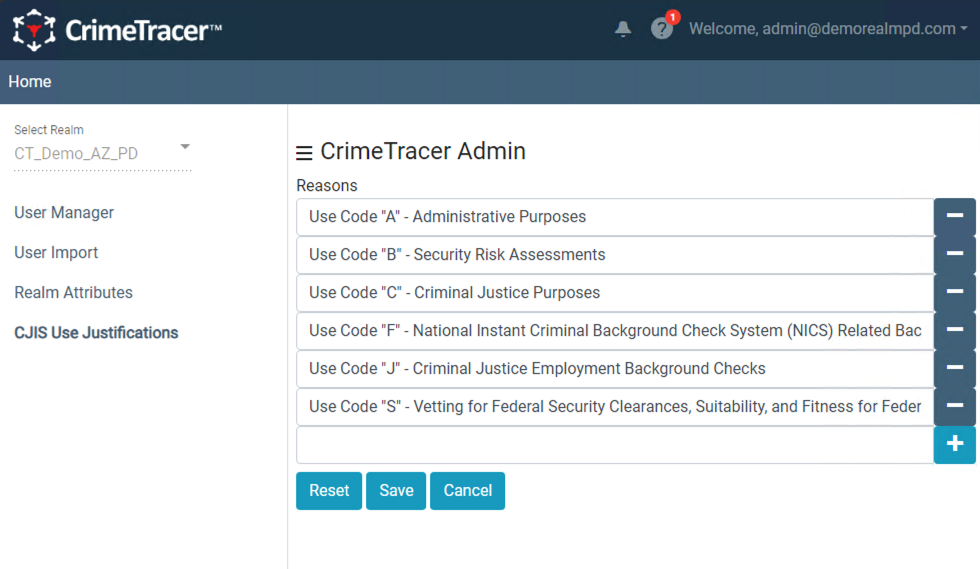
Use Justifications can be customized for each realm. Users can select from these options at login time or when a Use Justification is required.
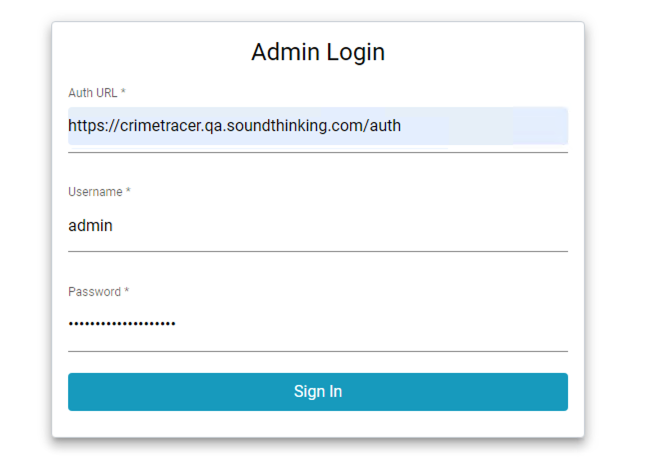
Global Admins are similar to regular admins with some important differences.
Firstly, Global Admins are responsible for multiple realms. In addition, when Global Admins navigate to the Administration page, they are presented with a secondary Login Screen.
In the URL field, enter the URL for your Auth Instance, followed by the username and password of your Master account.